

Fifteen years and a few hundred AAAs later, never in my life have I thought that someday I would own (nearly) complete set of DDR arcade computers (up to SD cabinet) capable of running any mix any time. It all started from a privatization, a yearn for nostalgia, some luck, and courage$$$. Personally, some mix stole my heart and by having the chance to re-play them in their legitimate state would bestow incomparable experience to anything an open-source platform could offer.
Here they are:
–
> Gen #1 – System 573 Digital (est 1998) = DDR 3rdMIX >> DDR EXTREME
> Gen #2 – Python 2 (est 2004) = DDR SuperNOVA >> DDR SuperNOVA2
> Gen #3 – Bemani PC Type-4 (est 2008) = DDR X >> DDR A20 PLUS
A closer look: System 573 Digital

This is the grandfather who ran so many classic mix for a great number of years. Mine is a digital variant of 573 that supports these following series:
–
> Dance Dance Revolution 3rd Mix
> Dance Dance Revolution 3rd Mix+
> Dance Dance Revolution 3rd Mix Asian
> Dance Dance Revolution 3rd Mix Korea
> Dance Dance Revolution 3rd Mix Korea Ver.2
> Dance Dance Revolution 4th Mix
> Dance Dance Revolution 4th Mix+
> Dance Dance Revolution 5th Mix
> Dance Dance Revolution 6th Mix / DDRMAX
> Dance Dance Revolution 7th Mix / DDRMAX 2
> Dance Dance Revolution Extreme
> Dance Dance Revolution Solo 2000
> Dance Dance Revolution Solo 4th Mix
> Dance Dance Revolution Solo 4th Mix+
> Dance Dance Revolution Solo Bass Mix
> Dancing Stage Euromix
> Dancing Stage Euromix 2
> Dancing Stage Featuring Disney’s Rave
> Dancing Stage Featuring Dreams Come True

Nostalgia would suffice as an ultimate reason for getting this unit (aside from ‘unfinished black flags‘), which I purchased from a friendly fella in Spain. On arrival, it didn’t weigh as much as his juniors (around 4 kg; certainly no HDD), but still felt firm enough on my hands. It also has smaller dimension compared to newer hardware: 300 x 300x 92 mm.

List of connectors/ plugs according to my current knowledge:
–
> Optical drive (CD/ DVD-ROM) = Running install/ play disc
> JAMMA socket = Handles cabinet inputs + power supply
> Test = Unused
> Dip switches (x4) = Specifies whether the 573 should load from onboard memory or CD/ DVD drive
> USB = Unused
> RGB = Video output (15KHz)
> Line Out 1 (RCA) = Audio output (stereo) – to cab’s amplifier
> Small plug (bottom right) = Unused
> 1P plug (white) = Handles P1 inputs
> 2P plug (orange) = Handles P2 inputs
> Red plug = Handles cabinet lights
> White plug = Handles bass neon lights

> Security cassette = Legitimacy verification
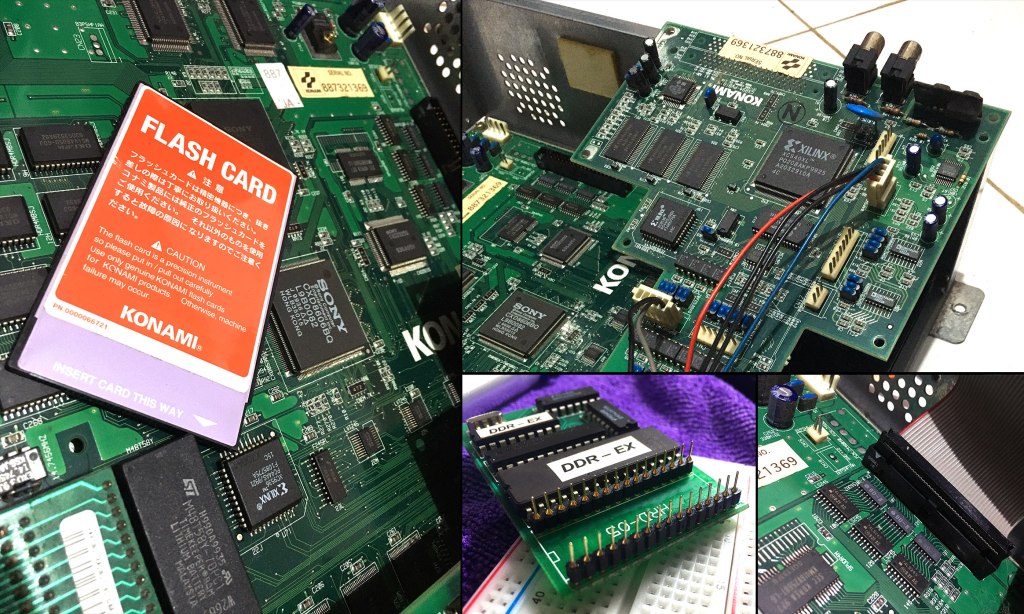
> Flash card = Data storage
System 573 specs is based on original PlayStation hardware with some modifications. I haven’t researched much about this relic but here’s some components that I think worth noticing:
–
> GX700 board = The mainboard of course
> Boot/ EEPROM = Required for system boot
> RTC RAM = Required to save settings
> IDE socket = To connect an optical drive
> Digital I/O = Decoding digital audio + handles lights & pad I/O
> 32MB flash card = Required to play 3rdMIX >> EXTREME (for DDR games, it needs to be in SLOT 2)
There are several types of known EEPROM:
–
1. Konami boot ROM = A single IC chip not mounted on a PCB (it has KONAMI 700A01/ 700B01 printed on it)
2. Universal modboard = A PCB with 3 ICs on it, usually accompanied by a few resistors
3. Single mix modboard = A PCB with more than 3 ICs on it
4. Betson boot ROM = A single IC chip with pale sticker in the center, does not say KONAMI on it.
The 573 doesn’t need a cooling fan because old tech won’t get hot like newer ones (mine came with no fan), but if you insist to have one then a 2-pin 12v mini fan should fit in (find the pin near IDE socket).

Be extra careful when cleaning up/ removing any components because some of them are very delicate and prone to damage (yep, I broke a modboard pin on my first try – thank God I fixed it a couple of days later). Use small & soft brush to get rid of big particles and use isopropyl alcohol as needed on a soft cloth to GENTLY wipe any board.
Someday, if your RTC RAM ever get sick/ dead (it will show ‘RTC BAD/ Error Note 605’ during boot), it’s not game over yet for the 573. First thing in the morning: look for a replacement M48T58Y-70PC1 chip somewhere on the internet, some expert said that it’s safer to buy several of them from different sellers, in case some of them already died by the time they arrive (expected from discontinued old stocks). Second, you will have these two options:
1. Call a seasoned technician to replace the RTC chip for you
2. Do it yourself cautiously with proper tools (don’t forget to use flux when soldering)

It is more likely that your 573 has been stored for years/ decades with minimum maintenance before you finally get it, usually the unit will suffer from deteriorated metal cover surface with some nasty oxidation. I used metal polish on a clean cloth to get rid of the ugly wounds by wiping them in circular motion while giving slight pressure until the paste gets dark (duration will vary depend on the damage). After that, wipe it clean and you will be surprised at how ‘brand new’ it can be.

The CD/ DVD drive needs to be mounted properly just beneath top metal sheet (x4 small screws; tighten from the top) so they won’t squash and cause damage to PCB components below it. Here’s some list of compatible drives for the 573:
–
> Compaq 179137-701
> LG GCR-8523B
> LG GDR-8164B (confirmed great for analog mixes and super discs)
> LG GH22NP20 Multi DVD Rewriter
> Lite-On LH-18A1H (confirmed working for analog mixes and super discs)
> Lite-On LTD-163
> Lite-On LTR-40125S
> Lite-On XJ-HD166S
> Toshiba XM-5702B
> Matsushita CR589B (this is the stock drive; works with analog mixes)
> Matsushita SR8589B
> MITSUMI CRMC-FX4830T
> NEC CDR-1900A
> Panasonic CR594C
> SONY DRU-510A
> SONY DRU-810A
> LG GDR-8163B (confirmed working with analog mixes)
> TEAC CD-W552E
Make sure you have the jumper on these drives set to master. Also, the following are eBay searches for two of the best drives found to work:
> GDR-8164B
> Lite-On LTD-163
If $245+ feels reasonable, you can also consider an IDE simulator to replace conventional drive. It has no moving parts and offer faster loading times, making it more reliable than optical drives.

I got my wooden plate from a spare cab, so it automatically fit inside my main J-cab PCB slot without additional resizing. After that, use a cordless drill to make proper holes for 4 screws to hold the PCB in place.

My SuperNOVA2 red cabinet came with EXT-I/O wirings by default, therefore I need to re-route some plugs from it to the 573. You won’t need additional power plug because the 573 gets them directly from JAMMA connector (IIRC the 5v & 12v lines), don’t forget to provide correct voltage to the power supply (110v for Japan/ USA/ Korea – 220v for Europe).

Here are some plugs you will need to re-connect from the EXT-I/O + PORT 1 to the 573 if you are running an upgraded SD cabinet:
–
> Cabinet light = XMR-10V female red connector (previously ‘PORT 1’)
> P1 input = XMR-10V female white connector
> P2 input = XMR-10V female orange connector (both of them should be obvious)
> Bass neon light = XMR-06V female white connector (from ExNL on the right end of EXT-I/O)
Then finish the job with these guys: JAMMA + RCA + VGA (make sure to properly connect them with no broken wire).
My 573 came with DDR Extreme Pro v2 installed (awesome!) with ‘super disc’ support (even more awesome!). It actually pretty simple to prepare the disc if you have the ISO data. I recommend using imgburn software with slowest burning speed as possible (I am using 4x for my Verbatim DVD-R without issue). For ‘liberated’ 573s, there is no need to insert a security cassette prior boot.

Run installed mix: I assume your EEPROM is OK as it will take you pass the boot check. Be patience and wait until it gives you white screen before showing the loading progress. You should enter the game mode soon after.

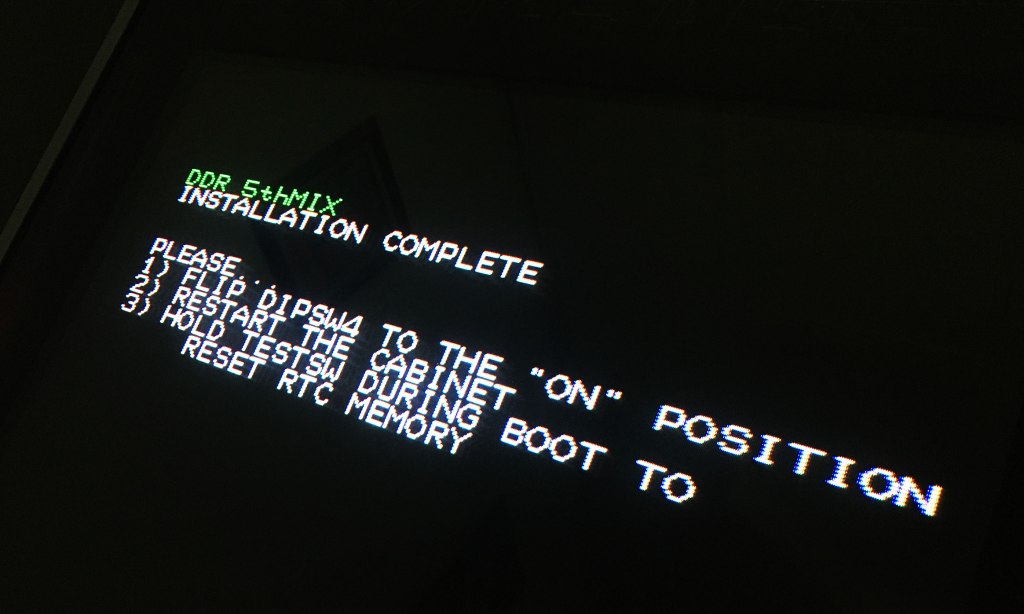
Install new mix: To change mix, you will need to swap the disc manually while the cab is powered off. To do that, use a long needle and plug it in one small hole you can find in front of the optical drive to eject the disc tray. Put the new disc in, flip the DIP #4 to OFF position (up) and boot the cab to install new DDR mix (it took me 8 minutes on average). After installation has been completed, flip the DIP #4 ON (down) and restart the cabinet. Hold the test button while re-booting (to reset RTC memory) until it tell you to stop, then the game will load normally.
Expect less on the visuals in terms of crispness compared to modern series. Menu/ demo/ result screens will render on 480i while it’s 240p for gameplay. For true lovers, it will still give you fulfillment even without 0.5x/ 0.25x speed modifier (aside from 1.5), note arrow, and screen filters.
Several games (5th >> EXTREME) will have some contents locked by default (except Ex Pro) and you will need to apply unlock code to release them. If you are a super disc user, there is a dedicated unlock code menu (unhidden) inside test menu. Follow the on-screen instruction to enter the code (if success, you will be brought back to another screen), after that choose ‘exit’ (NOT ‘Append’) and enter game mode to enjoy a fully-unlocked classic DDR.
A closer look: Python 2

The second-gen hardware which first introduced support for higher resolution rendering and e-Amusement play. There were just two DDR titles released on this platform:
–
> Dance Dance Revolution SuperNOVA
> Dance Dance Revolution SuperNOVA2

A legit Python 2 running final J-SN2 was included as part of my first acquisition of DDR cab. It has a dimension of: 395 x 305 x 80 mm (excluding metal mount) and weigh around 5-6 kg (a bit heavier than BEMANI PC) if combined with its default wooden plate.

List of connectors according to my current knowledge:
–
> JAMMA socket = Handles cabinet inputs
> PWR = Power supply
> Analog = Unused
> PORT 1 = Handles cabinet lights
> LAN = For internet connection (online play ONLY)
> COM1 = Handles P1+P2 inputs and bass neon lights (from EXT-I/O)
> COM2 = Handles card readers (if any)
> RGB = Video output (15/31KHz)
> Line Out 2 (RCA; yes it’s ‘2’) = Audio output (stereo) #1 – to cab’s amplifier
> Line Out 1 (RCA) = Audio output (stereo) #2 – to external speakers; e.g when at public DDR event)

> Dip switches (x4) = Unused (except to bypass EXT-I/O to boot the game)
> Security plugs (x2) = Legitimacy verification; black (on plug 1) for booting game; white (on plug 2) for e-Amuse play
Python 2 is pretty much a retail PlayStation2 console (NTSC J-SCPH-5000 series) connected to a dedicated I/O board called P2IO. Some important components we should be careful to play with:
–
> PS2 unit = The computer
> P2IO = Connects PS2 to the cab
> PATA HDD = OS + game data
> USB socket (x2) = 1 for data + 1 for electrical grounding
> MCIF board = Unused on DDR (this was used on other Python 2-based games)
One key aspect of this hardware: Konami ‘married’ the PS2 with its HDD (it will check for HDD serial numbers upon boot for decrypting data – it won’t do anything good if we switch the HDD and vice versa). One critical warning: never attempt to clone the HDD by yourself without proper ‘know-how’ (it can brick the HDD and will render it useless for future use). Alternatively, you can seek help from an ‘expert’ if you are full of doubt. Even so, it won’t boot into the game officially (except in the midnight). However, even if the PS2 and/ or HDD isn’t working anymore, you can still make use of the P2IO for Stepmania conversion.

To properly install Python 2, an EXT-I/O is required to be present (this board was introduced from 1st SuperNOVA) so that the machine can read individual foot panel sensors and light them up. Technically, you can bypass this requirement by jumping pins (1 & 6) on the stage light connectors for both players and flipping DIP #2 on the P2IO (positioned beside the PLUGs) to put the game into MANUFACTURER mode. This way, the game will show a foot panel error upon boot but will continue anyway. However, the stage I/O check and foot panel lights will be non-functional in this configuration.
You can use this guide if your cab runs system 573 natively prior conversion. If not (e.g already SuperNOVA’ed or X’ed), finish the job with these guys: JAMMA + RCA + VGA (supports 15 or 31khz output) + PORT 1 + COM1 + COM2 (if both card readers are present) + power + security plug(s). Ignore MCIF & ANALOG port because they have no use for DDR. Again, don’t forget to provide correct voltage to the power supply (110v for Japan/ USA/ Korea – 220v for Europe).


Ensure that the PS2 power switch is flipped ON (it’s in the back) before turning the cabinet ON. If the HDD is working, it will boot into Konami BIOS before the hardware check screen (approximately 3 minutes in total to enter game mode), and if it isn’t working, you will see a PS2 home screen looping till the end of time instead. Just in case you have a locked SuperNOVA2, you can apply these codes to unseal more contents: songs, courses, and more.
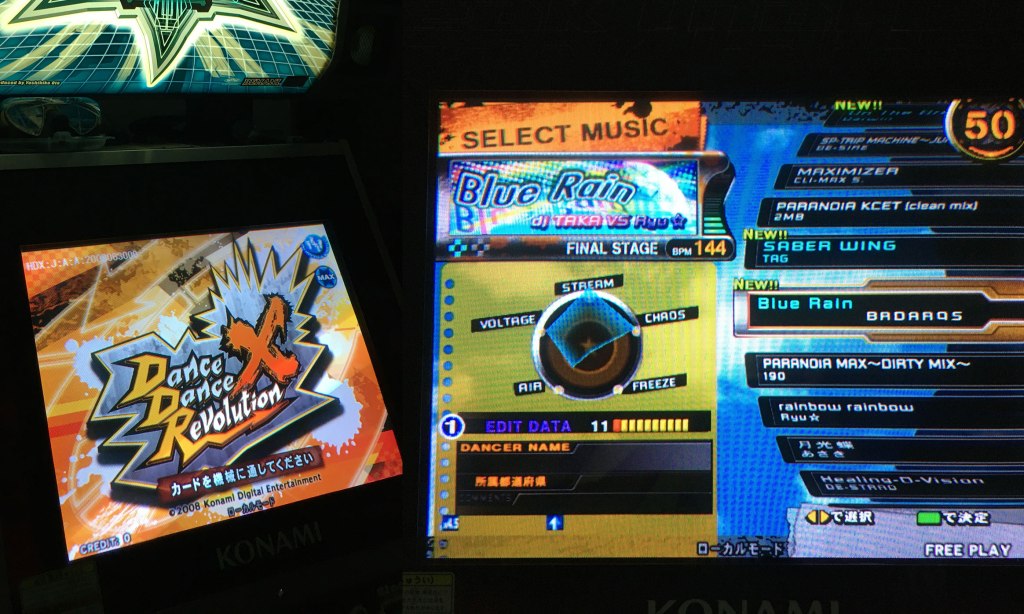
A closer look: BEMANI PC Type-4 (Dragon)
This is the the third-generation DDR hardware known as ‘Bemani PC Type-4’ (dubbed the ‘Dragon PCB’ by the community) that works with the Standard Definition (SD; Gen 1 & 2) and the Black X HD cab, allowing you to run plenty of modern DDR versions:
–
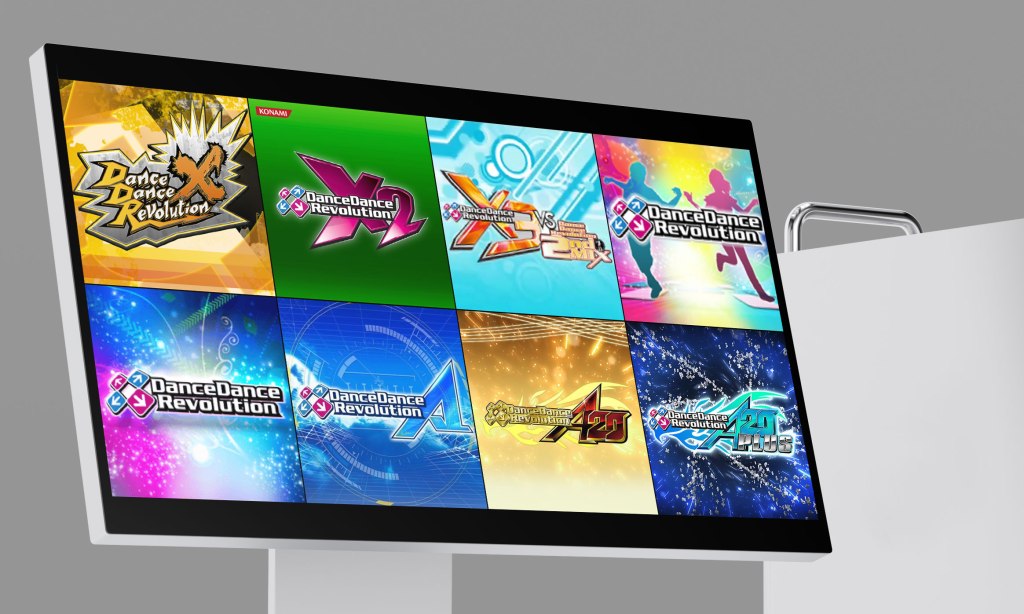
> Dance Dance Revolution X
> Dance Dance Revolution X2
> Dance Dance Revolution X3 vs 2ndMIX
> Dance Dance Revolution (2013)
> Dance Dance Revolution (2014)
> Dance Dance Revolution A
> Dance Dance Revolution A20
> Dance Dance Revolution A20 PLUS
> Dance Dance Revolution A3
~ and hopefully there will be more mix ahead ~

To get my hands on this super-rare breed, I had to buy another set of DDR cabinet (yup, that’s right – better than get robbed by some weirdo). My unit came with a legitimate DDR X software with a dimension of: 395 x 305 x 80 mm (excluding metal mount) and weigh around 5 kg (slightly lighter than Python 2) if combined with its default wooden plate. A couple years later, I acquired another unit after purchasing a Japanese DDR X HD machine.
Interestingly, the exact same PCB is utilized to operate both the SD and HD versions of DDR games. It possesses the capability to automatically detect the cabinet’s environment based on the video output. If the VGA connection (from either P3IO or the motherboard) is present, the game runs in SD (at either 15 or 31 KHz). Conversely, if the DVI connection (only from the motherboard) is detected, the game runs in HD (720p).

Currently, there are three known combinations of industrial-grade motherboards + IO board to natively run modern DDR games on an arcade cabinet:
- Combo #1: IT945GME_M72 + DDR P3IO (official configuration; 32-bit – the original Dragon PCB board)
- Combo #2: ADE-704a (HM65 chipset) + DDR P3IO (unofficial configuration; 32-bit – utilizes the same connectors as the 945, but timing may be affected on some DDR versions) – you will need a modified white J-cab drive image to boot, otherwise it will throw a ‘board error’ screen.
- Combo #3: ADE-6291 + DDR P3IO (official replacement for a broken 945; 64-bit – may require new types of connectors and may not run older versions (pre-Ace) properly) – you will need another drive image (currently hidden in plain sight, but maybe with some luck you can get it from somebody in the community) since it’s meant for the 64-bit version of data.
It is imperative to obtain a spare motherboard (as I have done) in case of future hardware failures.
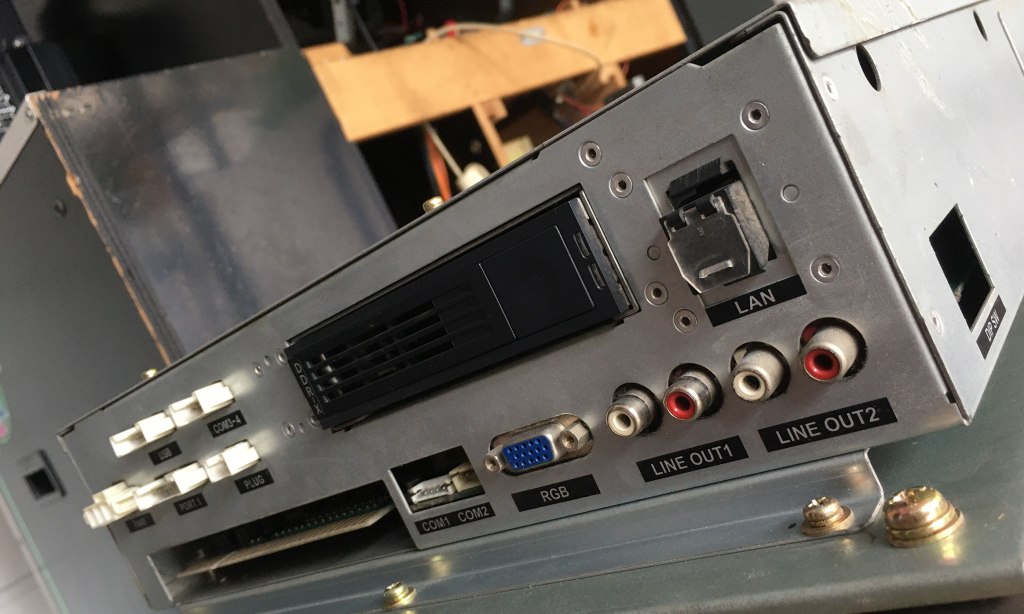
List of P3IO connectors according to my current knowledge:
–
> JAMMA socket = Handles cabinet inputs
> PWR = Power supply
> PORT 1 = Handles cabinet lights
> LAN = For internet connection (online play ONLY)
> COM1 = Handles P1+P2 inputs and bass neon lights (from EXT-I/O)
> COM2 = Connects to HD cab’s light spires (unused on SD cab)
> COM3-4 = Handles card readers
> USB = Connects to USB readers (for EDIT data purposes)
> RGB = Video output (15/31KHz)
> Line Out 1 (RCA) = Audio output (stereo) #1 – to cab’s amplifier
> Line Out 2 (RCA) = Audio output (stereo) #2 – to external speakers; e.g when at public DDR event)
> HDD Bay = Removable HDD tray (hot swap)
> PLUG = Legitimacy verification; should be connected to a plug adapter: black for booting game; white for e-Amuse play (DDR X & X2 only; newer mix dongles are USB-based)
> Dip switches (x4) = Unused by default


This unit is pretty much a low-end compact PC even for 2008’s standard: an IT945GME_M72 mainboard with a 32-bit single core Intel Celeron + ATI Radeon HD2400 + 512MB of 667MHz DDR2 SODIMM RAM, running on a 2008 Konami Windows XP Embedded. Then the board is connected to a dedicated I/O board called P3IO (FYI, the one used for DDR is slightly different from GFDM’s).

If you wish to enhance your hardware for improved performance during gameplay, it is recommended to consider certain upgrades. Assuming you are using the same Combo #1 configuration as mine, here are some known upgrade recommendations:
- RAM: 1GB >> 4GB
Many people vouched for a pair of Samsung M470T5663EH3-CF7 due to its reliability. Ensure they are installed precisely, as any imprecision may result in error during boot. Keep in mind that in a 32-bit system, it will be detected as 3.2GB. - CPU: Intel Celeron M 340 >> Core 2 Duo T7400
Remember to apply a high-quality thermal paste during the new CPU installation. - GPU: ATI Mobility Radeon HD 2400 >> HD 2600
It is mandatory to update the video driver and perform an EWF commit to save changes. Please note that the GPU is often the first component to experience issues. - Storage: SATA HDD >> SATA SSD
This will significantly reduce load times. You can easily clone the original drive using an HDD bay such as ORICO-6228US3-C. It’s worth mentioning that PC-based DDR systems no longer rely on HDD serial verification for booting post-SuperNOVA.
Keep your expectation in control because the enhancements may yield insignificant results since the current DDR data is primarily designed to utilize a single-thread processing system and cannot fully leverage the capabilities of a multi-core CPU. It is recommended to replace the thermal paste on (both) the CPU + GPU if it hasn’t been done previously as a factor to prevent overheating since this is an old board. It is also important to regularly (and gently) clean the board and exhaust fan to remove any accumulated dust as a mean of extra care. This maintenance practice helps to ensure optimal performance and increase the board’s longevity.

Generally, it is safe to clone the HDD for backup/ preservation purpose since it uses Windows OS (a whole different story for Python’s), choose one method:
–
1. Software-based = use either Norton Ghost or Macrium Reflect (or equivalent)
2. Hardware-based = use SATA HDD docking capable of cloning (e.g ORICO HDD Bay – no need for additional computer)

It is mandatory to have an EXT-I/O installed in the cab or this will be a futile attempt, then finish the job with these guys: JAMMA + RCA + VGA + PORT 1 + COM1 + COM3-4 + USB (if the hardware is present) + power + security plugs (either classic or USB type; if it’s the latter – connect them to the mainboard via USB extension cables) + LAN (if your setup has support for ‘online play’). To switch between versions, simply swap the HDD & security plugs then reboot. Don’t forget to provide correct voltage to the power supply (100v for Japan, 120v for USA, 220v for Europe and South Korea)


Before everything else, make sure all PC components (like SDRAM sticks) are properly plugged in (if not, the mainboard will beep continuously/ repeatedly), then turn ON the cab. If nothing is broken, you will be taken to a series of boot sequence: Windows XPe >> hardware check >> game mode (around 1.5-2 minutes in total). If you don’t have access to card readers and/ or USB readers, you will be stopped at ERROR screen upon hardware checking. To bypass it, push test button to enter test menu screen then proceed to game mode from there.
DDR X-X3 supports offline play while DDR 2013 or later will require internet connection with e-Amuse support to boot into game mode. Just in case you have a locked X, you can apply these codes to unseal more contents: songs, courses, and more. One more thing, this PCB unit can also be utilized to run Stepmania or OpenITG (I haven’t try this one but you should be able to find help in the community).

“Where there’s a will, there’s a way” they said… so if you don’t own a BEMANI PC Type-4 PCB, with some backup luck, you can still build a similar hardware using other BEMANI PC components (with equivalent specs) to assemble a ‘Chimera’ hardware. You can get the mainboard from the first generation of GFDM XG/ Reflec Beat/ Jubeat (in rare cases, you can find them on Yahoo Auction Japan website or some community channels on Facebook/ Discord). For the P3IO, you can use the one from GFMD V4-V8 series just fine.
This hardware hack will enable you to run DDR X and above with arcade-accurate timing without owning the original hardware (because DDR software is extremely picky about the hardware). Be advised that it won’t recognize the card readers by default since non-DDR P3IO doesn’t come with a COM3-4 port (it will show ERROR upon boot). To solve the issue, you will need to redirect the COM3-4 port to the COM2 port using certain software hack (only applicable for SD cab). If you insist to pursue this path and still helpless, I might be able to offer some assistance (PM me).
It is personally fulfilling to have nearly every ‘official’ DDR mix within grasp. Additionally, can opt to install a high-quality JAMMA extender to make switching PCB task easier, because it can be difficult to remove a JAMMA harness from a PCB (plus we can lengthen its lifespan this way – it’s still an electronic). If playing DDR in official way doesn’t suit you best, Stepmania is a great alternative.
Thank you for reading, I hope you find this story useful.

Leave a reply to Wilson Ucros Cancel reply